
Introduction (100-150 words)
A garden lights installation guide can help you plan, install, and position outdoor lighting safely and effectively. Whether you are adding pathway lights, spotlights, string lights, or low-voltage fixtures, the right installation method can improve both the appearance and safety of your garden.
In this guide, you’ll learn how to prepare for installation, choose the right power source, position your lights, connect the wiring, and avoid common installation mistakes. You’ll also find practical tips for testing and maintaining your garden lights after installation.
Table of Contents
Types of Garden Lights (and Which One to Choose)
Before you start any garden lights installation, you need to pick the right type of light. Your choice affects the cost, the tools you need, and how much work the project will be. There are three main types.
Solar Garden Lights (Easiest, No Wiring)
Solar lights are the simplest option. Each fixture has a small solar panel and a rechargeable battery. It charges during the day and turns on automatically at dusk. There is no cable, no transformer, and no electrical work.
- Best for: renters, small gardens, and quick decorative touches.
- Downsides: They are dimmer than wired lights, and their performance drops on cloudy days and in winter. Cheaper models often fail after a season or two.
Low-Voltage (12V) Lights (Best Balance of DIY-Friendly and Reliable)
Low-voltage systems use a transformer that plugs into an outdoor outlet and reduces household power from 120V to 12V. A cable runs from the transformer to each fixture. Because the voltage is low, the cable can be buried shallow, and the system is much safer to handle than standard wiring.
- Best for: most homeowners. It is the most popular choice for DIY landscape lighting because it is bright, reliable, and flexible. You can add or move fixtures later.
- Downsides: It takes more planning and effort than solar, and you need a nearby outdoor outlet.
Line-Voltage (120V) Lights (Brighter, Usually Needs an Electrician)
Line-voltage lights connect directly to your home’s electrical supply. They produce strong light and suit large areas, tall trees, and security floodlighting.
- Best for: large properties and high-output needs.
- Downsides: The wiring must be buried deeper, often in conduit, and must meet local electrical codes. In most cases you should hire a licensed electrician.
Quick Comparison Table
Feature
Solar
Low-Voltage (12V)
Line Voltage (120V)
Cost
Lowest
Moderate
Highest (includes labor)
Difficulty
Very easy
Moderate, DIY-friendly
“Advanced,” the electrician advised.
Brightness
Low to medium
Medium to high
High
Maintenance
Replace batteries and clean panels.
Occasional bulb and connection checks
Minimal, but repairs need a pro.
Wiring needed
None
Yes, low-voltage cable
Yes, buried line-voltage cable
Which should you choose? If you want zero wiring, go solar. If you want dependable light and are comfortable with basic tools, choose low-voltage. If you need powerful lighting over a large area, call an electrician for line-voltage. The rest of this garden lights installation guide focuses on low-voltage systems, with a separate section on solar.
Tools and Materials You’ll Need for Garden Lights Installation
Gather everything before you begin. It prevents mid-project trips to the hardware store.
Materials Checklist
Transformer: converts 120V to 12V. Choose one with a built-in timer or photocell if possible.
Low-voltage cable: 16-gauge for short, light runs; 14- or 12-gauge for longer runs or heavier loads.
Fixtures: path lights, spotlights, or well lights, depending on your plan.
Bulbs or LED modules: LEDs use less power and last far longer than halogen.
Waterproof connectors: gel-filled or sealed connectors are best for outdoor use.
Stakes or mounting hardware: to keep fixtures steady.
Timer or photocell: if the transformer doesn’t include one.
Tools Checklist
Spade or flat shovel
Wire strippers and cutters
Screwdriver
Measuring tape
Garden hose or rope (for marking the cable route)
Work gloves and safety glasses
Optional Tools
Cable burying tool: a slit trench tool that makes burying cable in lawns quick.
Voltage tester or multimeter: helps you find problems and check voltage at the last fixture.
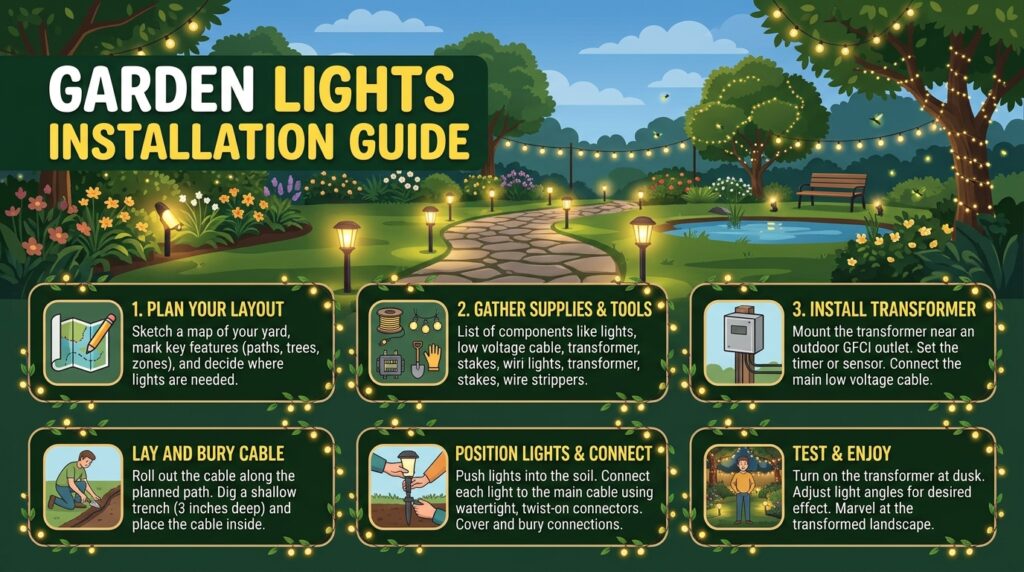
Step 1: Plan Your Garden Lighting Layout
Good planning is what separates a polished result from a messy one. Spend time on this step before you dig.
Decide What to Highlight
Walk your garden at dusk and list what you want to light. Common targets include:
- Paths and walkways for safety
- Steps and level changes to prevent trips
- Trees and tall plants for drama
- Patios and seating areas for ambiance
- Water features and garden beds as focal points
- Entrances for security and welcome
Pick a few focal points. You don’t need to light everything.
Lighting Techniques
Different effects need different techniques:
- Path lighting: short fixtures along walkways that cast a pool of light on the ground.
- Uplighting: fixtures placed at ground level and aimed up at trees, walls, or tall plants.
- Downlighting: fixtures mounted high (in trees or on eaves) that mimic moonlight.
- Spotlighting: a narrow beam aimed at a statue, plant, or architectural feature.
Mixing two or three techniques gives the best look.
How to Sketch a Layout and Calculate Total Wattage
Draw a simple map of your garden, including the house, outlet, paths, and planting beds.
Mark each fixture position with a symbol.
Trace the cable route from the transformer to every fixture.
Add up the wattage of all fixtures. For example, 10 fixtures at 4W each is 40W.
You’ll use the total wattage in Step 3 to choose the right transformer.
Step 2: Choose the Right Placement and Spacing
Placement determines how good your lighting looks. Poor spacing creates harsh spots and dark gaps.
Recommended Spacing for Path Lights
Space path lights are 6 to 8 feet apart. Stagger them on alternating sides of the path for a natural look, rather than lining them up like runway lights. For steps, place one light for one or two steps, or use lights mounted into the risers.
Avoiding Glare and Light Pollution
Use shielded fixtures or aim lights away from eye level.
Choose warm white light (around 2700K to 3000K) for a cozy look. Cooler tones can feel harsh in a garden.
Keep brightness modest. Lower-wattage bulbs often look better than strong ones.
Avoid aiming lights toward neighbors’ windows or the night sky.
Considering Sight Lines From Inside the House
Stand at your windows and doors at night (or imagine it) and decide what you want to see. A well-lit tree or garden bed viewed from the living room is a bonus. Avoid placing bright fixtures where they’ll reflect in the glass.
Step 3: Install the Transformer (for Low-Voltage Systems)
The transformer is the heart of your system. Install it first so you can test as you go.
Location, GFCI Outlet, and Mounting Height
Place it near an outdoor outlet that is GFCI protected. If you don’t have one, have an electrician install it.
Mount it on a wall or post, at least 12 inches above the ground, out of reach of splashing water and snow.
Choose a central location if possible. Starting the cable run in the middle of the layout reduces voltage drop.
Keep it shaded and ventilated to prevent overheating.
Sizing the Transformer to Your Wattage Load
Take the total wattage from your plan and pick a transformer rated for at least that amount. A good rule is to keep your load at 80% or less of the transformer’s capacity. This leaves room to add fixtures later and keeps the transformer from running hot.
Example: with a 40W load, choose a 60W transformer or larger.
Step 4: Lay Out and Connect the Cable
Test the Layout Before Burying Anything
Lay the cable along your planned route on the surface and place each fixture at its position. Plug in the transformer and turn it on after dark. Check how the lighting looks, then adjust positions. It is far easier to move a fixture now than after you’ve dug trenches.
Connecting Fixtures to the Main Cable
Most low-voltage fixtures use one of two connection types:
- Quick-connect (piercing) connectors: clamp the fixture lead onto the cable. They are fast and good for beginners.
- Wire nut or compression connections: more secure and better in wet conditions when combined with waterproof gel caps.
Keep each connection firm and sealed. Make sure the connection points face down or are protected from standing water.
Burying Cable Safely
Low-voltage cable usually needs to be buried only about 6 inches deep, though local rules vary. Use a spade to cut a narrow slit, push the cable in, and close the soil. In flower beds, cover cable with mulch. Where cable crosses a path or driveway, run it through conduit for protection.
Before digging, call your local utility locating service to mark underground lines.
Step 5: Install and Position the Fixtures
Securing Stakes and Mounting Fixtures
Push each stake into the soil until it stands firmly. In hard soil, loosen the ground with a screwdriver or small spade first. For walls, decks, and trees, use the mounting hardware supplied with the fixture. Attach the cable lead without pulling the wire taut, and leave a little slack to allow for movement and soil shifts.
Aiming and Adjusting Beam Angles
Wait until dark to aim your lights. Stand where you’ll normally view the garden and adjust each fixture:
- Aim uplights to graze the trunk or wall, not shine into your eyes.
- Angle spotlights slightly off-center on the subject for depth.
- Tilt path lights so the pool of light overlaps with the next fixture.
Tighten adjustment screws once you’re happy with the result.
Step 6: Test, Adjust, and Set Timers
Troubleshooting Flickering or Dim Lights
If your lights flicker or look dim, check these common causes:
- Loose or corroded connections: reseat or replace the connector.
- Voltage drop: the last fixtures on a long run look dim. Use thicker cable or split the run.
- Overloaded transformer: reduce the load or upgrade the transformer.
- Damaged cable: look for cuts from shovels or lawn equipment.
- A failed bulb: swap it with a working one to test.
A multimeter lets you measure voltage at the last fixture. It should be about 10.5V to 12V.
Setting a Timer or Photocell
Most modern transformers include both settings:
- Photocell: switches lights on at dusk and off at dawn automatically.
- Timer: lets you set exact on and off times, for example, 6 PM to 11 PM to save energy.
Combining both is ideal. Lights come on at dusk and turn off at the time you choose.
How to Install Solar Garden Lights (Quick Guide)
If you chose solar, installation takes minutes.
Pick a sunny spot. Panels need 6 to 8 hours of direct sunlight for a full charge.
Switch the light on and charge it for a full day first, if the instructions recommend it.
Push the stake into the soil or mount the fixture where it will be exposed to the sun.
Angle the panel toward the sun if it’s adjustable.
Check at dusk that the light turns on automatically.
Tips for Better Solar Performance
Keep panels clear of leaves, dust, and shade from plants.
Expect shorter run times in winter. Consider moving lights to the sunniest spots or bringing them inside during the darkest months.
Replace rechargeable batteries every 1 to 2 years.
Common Garden Lighting Installation Mistakes to Avoid
Most problems come from a handful of errors. Avoid these, and your system will perform better and last longer.
Voltage drop from long cable runs. On runs over about 100 feet, lights at the end get dimmer. Use thicker cable, shorten runs, or use multiple runs from the transformer.
Overloading the transformer. Adding too many fixtures causes overheating and flickering. Stay under 80% of the rated capacity.
Poor waterproofing of connections. Moisture is the top cause of failure. Use sealed, gel-filled connectors and avoid leaving connections in puddles.
Over-lighting the space. More light is not better. Too many bright fixtures flatten the garden and waste energy. Aim for soft pools of light and shadows.
Skipping the test. Always test before burying cable.
Garden Lights Maintenance Tips
A little upkeep keeps your garden lights looking good for years.
- Clean lenses and solar panels every few months with a soft cloth and water.
- Replace failed bulbs promptly. A dead bulb can stress the rest of the circuit if you’re using halogen.
- Check connections each season for corrosion or moisture, especially after winter.
- Trim plants that grow in front of fixtures.
- Re-aim fixtures as trees and shrubs grow.
- Inspect cable for exposed sections after heavy rain or digging.
How deep should I bury garden light cables?
Low-voltage cable is typically buried about 6 inches deep. Line-voltage cable must be buried deeper, often 12 to 24 inches or in conduit, depending on your local electrical code. Always check local rules.
Can I install garden lights myself?
Yes, for solar and low-voltage systems. They are safe and use basic tools. For line-voltage (120V) lighting or new outdoor outlets, hire a licensed electrician.
How far apart should garden lights be placed?
For path lights, space fixtures 6 to 8 feet apart. For uplighting and spotlights, position them based on the object, usually 1 to 3 feet from the base of a tree or wall.
How many garden lights do I need?
It depends on the size of your garden and your goals. A typical 30-foot path needs 4 to 5 path lights. Start with a plan, then add lights gradually. It is easier to add than remove.
Are LED garden lights worth it?
Yes. LEDs use up to 80% less energy than halogen bulbs, last 15,000 hours or more, and run cooler. They allow you to run more fixtures on a smaller transformer, which makes them the best choice for any garden lights installation.
Conclusion
Installing garden lights is a manageable weekend project when you follow a clear plan. This garden lights installation guide walked you through the whole process:
Choose your system. Solar is the easiest, low-voltage offers the best balance, and line voltage is for large or high-output jobs.
Plan your layout. Decide what to highlight, pick your lighting techniques, and total up your wattage.
Place fixtures with care. Space path lights 6 to 8 feet apart and avoid glare.
Install the transformer near a GFCI outlet and size it so your load stays under 80% of capacity.
Lay and connect the cable. Test the layout first, seal your connections, and bury the cable about 6 inches deep.
Position, test, and automate. Aim each fixture after dark and set a timer or photocell.
Keep it simple. A few well-placed lights look better than a yard full of bright ones. Once your system is running, a quick seasonal check of the lenses and connections will keep it working for years.
Ready to get started? Grab a notepad, sketch your garden, and map out your first fixtures tonight. Have a question or a photo of your finished project? Share it in the comments below. If you found this guide helpful, share it with a friend who is planning their own garden lighting, and check out our related posts on [garden lighting ideas] and [solar garden lights] for more inspiration.