
Introduction
Garden lighting uplighters are one of the best ways to enhance the beauty and functionality of your outdoor space. Whether you want to highlight trees, illuminate pathways, showcase architectural features, or create a warm evening atmosphere, the right uplighters can make a dramatic difference.
In this guide, you’ll learn everything you need to know about garden lighting uplighters, including the different types available, how to choose the right fixtures, installation tips, common mistakes to avoid, maintenance advice, and answers to frequently asked questions. By the end, you’ll have the knowledge to create a stylish, safe, and energy-efficient garden lighting setup that complements your landscape and lasts for years.
What Are Garden Lighting Uplighters?
Garden lighting uplighters are outdoor light fixtures designed to shine light upward, drawing attention to features above them. Unlike standard garden lights that spread light across the ground, uplighters create dramatic lighting effects by illuminating trees, shrubs, walls, statues, fences, and other landscape elements from below.
These lights are commonly used in residential gardens to add depth, highlight focal points, and create a welcoming atmosphere after dark. Whether you’re designing a modern outdoor space or enhancing a traditional garden, garden lighting uplighters can make your landscape look more attractive and visually interesting at night.
Most garden lighting uplighters use energy-efficient LED technology, which provides bright illumination while consuming very little electricity. They are available in several styles, including spike-mounted models that can be pushed into the ground, in-ground fixtures that sit flush with the surface, and wall-mounted uplighters for highlighting vertical features. Solar-powered options are also available for homeowners who want a simple, wire-free installation.
One of the biggest advantages of garden lighting uplighters is their versatility. You can use them to showcase a single feature, such as a large tree or garden sculpture, or combine multiple uplighters to create layered lighting throughout your outdoor space. This technique adds depth, improves visibility, and enhances the overall appearance of your garden.
It’s also helpful to understand the difference between uplighters and spotlights. Although both are used to highlight outdoor features, uplighters are specifically positioned at ground level and directed upward to create dramatic vertical lighting. Spotlights, on the other hand, can be mounted in various positions and aimed in almost any direction depending on the lighting effect you want to achieve.
Choosing the right garden lighting uplighters depends on the size of your garden, the features you want to highlight, and the type of lighting effect you want to create. Selecting the appropriate brightness, beam angle, and waterproof rating will ensure your uplighters perform well and last for years in outdoor conditions.
How Garden Lighting Uplighters Work
Garden lighting uplighters are designed to direct light upward from ground level, creating a striking visual effect that highlights the features above them. They are typically installed at the base of trees, walls, shrubs, sculptures, or other landscape elements to draw attention to their shape, texture, and height.
Most modern garden lighting uplighters use LED technology, which produces bright, energy-efficient light while consuming very little power. Depending on the fixture, they can be powered by low-voltage wiring, mains electricity, or solar energy. Once installed, the light beam shines upward at a chosen angle to illuminate a specific feature without wasting light in unwanted areas.
The beam angle plays an important role in the final effect. A narrow beam creates a focused spotlight that is ideal for tall trees or statues, while a wider beam spreads light across larger surfaces such as walls, fences, or groups of plants. Many uplighters also have adjustable heads, allowing you to fine-tune the direction of the light for the best results.
To create a balanced landscape lighting design, homeowners often combine several garden lighting uplighters throughout the garden. This layered approach adds depth, reduces dark areas, and creates a warm, inviting atmosphere that makes outdoor spaces more enjoyable after sunset.
Benefits of Using Garden Lighting Uplighters
Highlight Trees
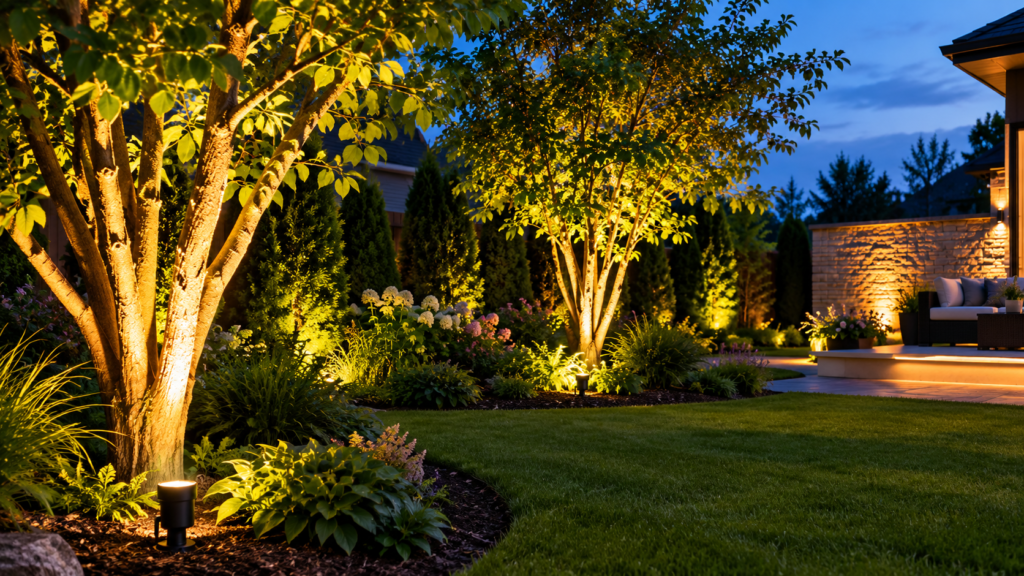
One of the most popular uses for garden lighting uplighters is showcasing trees. Placing an uplighter at the base of a tree emphasizes the trunk, branches, and foliage, creating a dramatic effect that adds depth and character to your garden. Larger trees may benefit from multiple uplighters to achieve even illumination.
Illuminate Walls and Fences
Plain walls and fences can become attractive design features with the help of garden lighting uplighters. Upward-facing light enhances textures such as brick, stone, or wood while making garden boundaries feel more welcoming and visually appealing.
Improve Security
A well-lit garden is not only more attractive but also safer. Garden lighting uplighters help reduce dark spots around your property, making pathways, entrances, and outdoor areas easier to see at night. Better visibility can also discourage unwanted visitors and improve overall home security.
Increase Curb Appeal
Adding garden lighting uplighters is an easy way to improve your home’s appearance after dark. By highlighting landscaping and architectural features, they create an elegant nighttime look that enhances curb appeal and leaves a lasting impression on visitors.
Extend Outdoor Living Space
With the right lighting, your garden becomes a comfortable place to enjoy long after the sun goes down. Garden lighting uplighters provide ambient illumination that makes patios, decks, seating areas, and outdoor dining spaces more functional and inviting for evening relaxation or entertaining guests.
Types of Garden Lighting Uplighters
Choosing the right garden lighting uplighters depends on your garden layout, the features you want to highlight, and your preferred power source. Different types of uplighters are designed for specific applications, from illuminating tall trees to accenting walls and pathways. Below are the most common types of garden lighting uplighters and their ideal uses.
LED Garden Lighting Uplighters
LED garden lighting uplighters are the most popular option because they are energy-efficient, long-lasting, and provide bright, consistent illumination. They consume far less electricity than traditional halogen lights while offering a lifespan of up to 50,000 hours. LED uplighters are available in warm white, cool white, and color-changing versions, making them suitable for a wide range of landscape lighting designs.
Solar Garden Lighting Uplighters
Solar garden lighting uplighters are powered by sunlight, making them an eco-friendly and cost-effective choice. They include a built-in solar panel that charges the battery during the day and automatically turns the lights on at dusk. These uplighters are easy to install because they do not require wiring, making them ideal for smaller gardens, flower beds, and areas that receive plenty of direct sunlight.
Low-Voltage Garden Lighting Uplighters
Low-voltage garden lighting uplighters operate on a transformer, typically using a 12-volt system. They are safer than mains-powered lights and are commonly used in residential gardens. Low-voltage systems provide reliable performance, are relatively easy to install, and can power multiple uplighters from a single transformer.
Mains-Powered Garden Lighting Uplighters
Mains-powered garden lighting uplighters connect directly to your home’s electrical system. They deliver consistent brightness and are ideal for larger gardens or permanent landscape lighting installations. Because they involve electrical wiring, installation should usually be carried out by a qualified electrician to ensure safety and compliance with local regulations.
In-Ground Garden Lighting Uplighters
In-ground garden lighting uplighters are installed flush with the ground, creating a clean and modern appearance. They are commonly used to highlight trees, walls, columns, and architectural features without the light fixture being highly visible. Their discreet design makes them a popular choice for contemporary landscape projects.
Spike Garden Lighting Uplighters
Spike garden lighting uplighters feature a pointed base that can be pushed directly into soil, mulch, or flower beds. They are easy to reposition whenever your landscaping changes, making them one of the most flexible lighting options. These uplighters are perfect for highlighting shrubs, plants, and smaller trees.
Smart Garden Lighting Uplighters
Smart garden lighting uplighters offer advanced control through smartphone apps or voice assistants. Many models allow you to adjust brightness, change colors, create lighting schedules, and automate your outdoor lighting. They are an excellent choice for homeowners who want convenience, energy savings, and customizable lighting effects.
Which Type Should You Choose?
The best garden lighting uplighters for your garden depend on your budget, installation preferences, and lighting goals. LED uplighters are the best all-around option for efficiency and durability, while solar models are ideal for simple, wire-free installation. Low-voltage systems offer a balance of safety and performance, mains-powered uplighters provide maximum brightness for larger spaces, and smart uplighters add convenience with advanced controls. Selecting the right type ensures your garden remains attractive, functional, and beautifully illuminated throughout the year.
Best Places to Install Garden Lighting Uplighters
Installing garden lighting uplighters in the right locations can completely transform the appearance of your outdoor space after dark. By placing uplighters strategically, you can highlight your garden’s best features, improve visibility, and create a warm, welcoming atmosphere. Here are some of the best places to install garden lighting uplighters.
Trees
Trees are one of the most popular features to illuminate with garden lighting uplighters. Position the light at the base of the trunk and aim it upward to highlight the bark, branches, and canopy. For large trees, using two or more uplighters from different angles creates a fuller and more balanced lighting effect.
Shrubs and Flower Beds
Smaller plants, shrubs, and flower beds also benefit from garden lighting uplighters. Soft upward lighting adds depth and texture while making colorful plants stand out during the evening. This technique works especially well around garden borders and landscaped areas.
Garden Walls
Installing garden lighting uplighters along garden walls highlights materials such as brick, stone, or concrete. The upward beam emphasizes texture and creates attractive shadows that add character to your outdoor space. Even plain walls become eye-catching features when properly illuminated.
Fences
Wooden and decorative fences can look far more appealing with carefully placed garden lighting uplighters. Positioning lights a short distance from the fence creates a gentle wash of light that enhances the design while improving visibility around the perimeter of your property.
Statues and Garden Sculptures
Garden statues, sculptures, and decorative ornaments become stunning focal points when illuminated from below. Garden lighting uplighters draw attention to fine details and create dramatic shadows that make these features stand out both day and night.
Water Features
Fountains, ponds, waterfalls, and other water features look especially impressive with garden lighting uplighters. The upward light reflects off moving water, creating a dynamic effect that adds elegance and tranquility to the garden. Always choose fixtures with an appropriate waterproof rating for installations near water.
Path Entrances
While path lights are designed to illuminate walkways, garden lighting uplighters can be used at path entrances to create an inviting focal point. Placing uplighters near decorative plants, stone pillars, or entrance features helps define the beginning of a pathway without overpowering the surrounding lighting.
Outdoor Seating Areas
Installing garden lighting uplighters around patios, decks, pergolas, or outdoor seating areas creates a comfortable atmosphere for relaxing or entertaining in the evening. Instead of shining light directly into seating areas, aim the fixtures toward nearby trees, walls, or architectural features to produce soft, indirect lighting that feels warm and inviting.
Tips for the Best Lighting Effect
To achieve professional-looking results, avoid placing all garden lighting uplighters at equal distances or aiming them in the same direction. Vary the beam angles and light intensity to create depth and contrast. Warm white LED uplighters are often the best choice for gardens because they produce a natural, welcoming glow while using very little energy.
How to Choose the Best Garden Lighting Uplighters
Choosing the right garden lighting uplighters ensures your outdoor space looks attractive, remains energy-efficient, and performs reliably in all weather conditions. With so many options available, it’s important to consider factors such as brightness, beam angle, durability, and power source before making your decision. Here are the key features to look for when buying garden lighting uplighters.
Brightness (Lumens)
Instead of focusing on wattage, compare garden lighting uplighters by their lumen output. Lumens measure how bright a light is.
As a general guide:
100–300 lumens: Small plants, flower beds, and decorative features.
300–600 lumens: Shrubs, garden walls, and small trees.
600–1,000+ lumens: Large trees, tall walls, and architectural features.
Choosing the right brightness helps create a balanced lighting design without making your garden appear overly bright.
Beam Angle
The beam angle determines how widely the light is spread.
Narrow beam (15°–30°): Best for statues, tree trunks, and other focal points.
Medium beam (30°–45°): Suitable for medium-sized shrubs and small trees.
Wide beam (45°–90°): Ideal for walls, fences, hedges, and larger landscape features.
Selecting the correct beam angle ensures your garden lighting uplighters highlight the intended feature effectively.
Color Temperature
The color of the light has a significant impact on the overall atmosphere.
Warm White (2700K–3000K): Creates a cozy, natural, and welcoming appearance. This is the most popular choice for residential gardens.
Neutral White (3500K–4000K): Offers a brighter, cleaner look that suits modern landscapes.
Cool White (5000K–6500K): Produces crisp, bright light that is better suited for security or commercial applications.
For most homeowners, warm white garden lighting uplighters provide the most attractive nighttime effect.
IP Waterproof Rating
Because outdoor lights are exposed to rain, dust, and changing weather conditions, always check the IP (Ingress Protection) rating before purchasing garden lighting uplighters.
IP65: Protected against rain and water jets.
IP67: Suitable for temporary immersion and harsh weather.
IP68: Designed for continuous underwater use, making it ideal for ponds and water features.
A higher IP rating generally offers better protection and longer-lasting performance outdoors.
Material Quality
The material used in garden lighting uplighters affects both durability and appearance.
Common materials include:
Stainless steel for corrosion resistance.
Aluminum for lightweight durability.
Brass for premium quality and long lifespan.
High-quality plastic for affordable installations.
Choosing weather-resistant materials helps reduce maintenance and extends the life of your lighting system.
Power Source
Garden lighting uplighters are available with different power options.
LED low-voltage: Energy-efficient, safe, and ideal for most gardens.
Solar-powered: Easy to install with no wiring required, but brightness depends on sunlight.
Mains-powered: Delivers consistent performance and is well suited to larger gardens.
Select the power source that best matches your installation requirements and maintenance preferences.
Adjustable Heads
Many garden lighting uplighters feature adjustable heads that allow you to change the direction of the light after installation. This flexibility is useful if your landscaping changes over time or if you want to fine-tune the lighting effect without moving the fixture.
Smart Features
Modern garden lighting uplighters may include smart technology such as Wi-Fi or Bluetooth connectivity. These features allow you to:
Adjust brightness remotely.
Change light colors.
Set automatic schedules.
Create lighting scenes.
Control lights using voice assistants.
Smart uplighters offer added convenience and can help reduce energy consumption through automated operation.
Consider Your Garden Layout
Before purchasing garden lighting uplighters, think about the size of your garden and the features you want to illuminate. Smaller gardens often require fewer, lower-powered uplighters, while larger landscapes may benefit from multiple fixtures arranged in layers. Planning your lighting layout in advance helps you achieve a balanced, professional-looking result without overspending.
LED vs Solar Garden Lighting Uplighters
When choosing garden lighting uplighters, one of the biggest decisions is whether to buy LED or solar-powered models. Both options have their advantages, but the best choice depends on your budget, garden size, and lighting needs.
LED garden lighting uplighters are known for their bright, reliable performance and long lifespan. They are commonly powered by a low-voltage transformer or mains electricity, making them an excellent choice for homeowners who want consistent lighting throughout the year.
Solar garden lighting uplighters, on the other hand, are powered by sunlight. They are easy to install because they require no wiring, making them ideal for smaller gardens or areas where running electrical cables is difficult. However, their brightness and operating time depend on how much sunlight the solar panel receives during the day.
The table below compares the two types of garden lighting uplighters to help you decide which is right for your outdoor space.
| Feature | LED Garden Lighting Uplighters | Solar Garden Lighting Uplighters |
| Brightness | Bright and consistent illumination with a wide range of lumen options. | Moderate brightness that depends on the amount of sunlight received. |
| Installation | Requires wiring and, in some cases, a transformer or professional installation. | Quick and simple to install with no electrical wiring needed. |
| Running Cost | Very low electricity consumption due to energy-efficient LED technology. | No electricity costs because they operate using solar energy. |
| Maintenance | Minimal maintenance, with occasional cleaning and infrequent bulb replacement. | Requires cleaning of the solar panel and eventual battery replacement. |
| Lifespan | Typically lasts 30,000–50,000 hours or more, depending on the product quality. | Solar panels last for many years, but rechargeable batteries usually need replacing every few years. |
| Weather Performance | Performs consistently in all seasons and weather conditions when properly installed. | Performance may decrease during cloudy weather, winter months, or in shaded locations. |
| Best Use Cases | Large gardens, trees, walls, architectural features, and areas requiring reliable brightness. | Small gardens, flower beds, pathways, and locations where easy, wire-free installation is preferred. |
Which Option Is Best?
For most homeowners, LED garden lighting uplighters are the better long-term investment. They provide brighter and more reliable lighting, perform well in all weather conditions, and offer a longer lifespan with very low energy consumption. They are ideal for highlighting large trees, walls, and other important landscape features.
Solar garden lighting uplighters are a great choice if you want an affordable, eco-friendly solution that is easy to install. They work best in sunny locations where the solar panels can receive several hours of direct sunlight each day. While they may not be as bright as wired LED systems, they are perfect for adding decorative lighting to flower beds, borders, and smaller outdoor spaces.
If your budget allows, many homeowners combine both types of garden lighting uplighters. LED uplighters can be used for key focal points that require consistent brightness, while solar uplighters provide accent lighting in less demanding areas. This combination creates an attractive, energy-efficient lighting design that enhances the beauty and functionality of your garden.
How to Install Garden Lighting Uplighters
Installing garden lighting uplighters correctly helps you achieve the best lighting effect while ensuring the system is safe and durable. Whether you choose low-voltage, mains-powered, or solar models, careful planning is the key to a professional-looking result. Follow these steps to install garden lighting uplighters in your outdoor space.
Step 1: Plan Your Lighting Layout
Start by deciding which garden features you want to highlight. Trees, shrubs, walls, statues, and water features are all excellent choices for garden lighting uplighters. Walk around your garden after dark with a flashlight to experiment with different lighting angles before installing the fixtures.
Mark the locations where each uplighter will be placed, making sure the lights are spaced evenly without overcrowding the area.
Step 2: Choose the Right Power Source
Select the power source that best suits your garden and budget.
Low-voltage LED uplighters: Safe, energy-efficient, and ideal for most residential gardens.
Solar uplighters: Easy to install with no wiring required.
Mains-powered uplighters: Best for permanent installations but typically require professional electrical work.
Choosing the correct power source will make installing garden lighting uplighters easier and ensure reliable performance.
Step 3: Position the Uplighters
Place each uplighter at the base of the feature you want to illuminate.
Position lights close to tree trunks for dramatic vertical lighting.
Place uplighters a short distance from walls or fences to highlight texture.
Angle the beam toward statues or architectural features to create depth.
Avoid aiming lights directly into windows or seating areas, as excessive glare can reduce comfort.
Step 4: Install the Fixtures
Install the fixtures according to the manufacturer’s instructions.
Push spike-mounted uplighters securely into the soil.
Install in-ground uplighters flush with the surface.
Secure wall-mounted fixtures firmly using suitable fixings.
Ensure every fixture remains stable and level after installation.
Proper installation keeps garden lighting uplighters secure and helps them withstand outdoor conditions.
Step 5: Connect the Wiring (If Required)
For wired garden lighting uplighters, route the cables neatly along garden borders or bury them underground to protect them from damage.
Connect all fixtures to the transformer or power supply following the manufacturer’s instructions. Double-check every connection before switching on the system.
If you are installing mains-powered lighting, it is safest to have the electrical work completed by a qualified electrician.
Step 6: Test and Adjust the Beam Angles
Turn on your garden lighting uplighters after installation and check the lighting effect from different viewpoints.
Adjust each fixture until the light highlights the intended feature without creating excessive glare or harsh shadows. Small adjustments in angle can make a significant difference to the overall appearance of your garden.
Step 7: Perform Regular Maintenance
To keep garden lighting uplighters working efficiently:
Clean the lenses regularly to remove dirt and debris.
Trim plants that may block the light beam.
Check wiring and connectors for signs of wear.
Replace damaged fixtures or worn seals promptly.
For solar models, keep the solar panels clean to ensure efficient charging.
Routine maintenance helps your lighting system perform well and extends its lifespan.
Installation Tips
For the best results, use warm white LED garden lighting uplighters to create a natural and welcoming atmosphere. Avoid placing too many lights in one area, as excessive lighting can make the garden look flat and unnatural. Instead, focus on highlighting key features and use a layered lighting approach to create depth, contrast, and visual interest.
Planning the Layout
A well-planned layout is the foundation of a successful garden lighting uplighters installation. Before placing any fixtures, walk around your garden and identify the features you want to highlight, such as trees, shrubs, walls, statues, or water features. Consider how your garden looks both during the day and at night to create a balanced lighting design.
Instead of installing uplighters everywhere, focus on key focal points. Layering light across different areas creates depth and visual interest while preventing the garden from looking overly bright. Sketch a simple layout or mark the proposed locations with stakes to help you visualize the final result before installation begins.
Choosing the Correct Position
The position of your garden lighting uplighters has a major impact on the final lighting effect. Place each uplighter close enough to the feature to illuminate it effectively without creating harsh glare.
Here are a few positioning tips:
Place uplighters at the base of trees to highlight the trunk and canopy.
Position lights slightly away from walls to emphasize texture and create attractive shadows.
Install uplighters near statues or sculptures to make them stand out at night.
Angle lights toward shrubs and flower beds to add depth and color.
Avoid aiming lights directly toward windows, neighboring properties, or seating areas.
Before fixing the lights permanently, test several positions to find the most attractive effect.
Wiring Low-Voltage Systems
Low-voltage garden lighting uplighters are popular because they are energy-efficient, safe, and relatively easy to install. These systems use a transformer to reduce household voltage, making them suitable for residential gardens.
When installing the wiring:
Position the transformer close to a weatherproof outdoor power outlet.
Route the low-voltage cable along flower beds, borders, or pathways.
Bury the cable a few inches below the soil or protect it with conduit where necessary.
Connect each uplighter securely using waterproof connectors.
Leave a small amount of extra cable near each fixture to allow for future adjustments.
Neat cable routing improves both the appearance and safety of your lighting system.
Installing Solar Uplighters
Solar garden lighting uplighters are one of the easiest outdoor lighting options to install because they do not require electrical wiring.
For the best performance:
Install the solar panel where it receives at least 6–8 hours of direct sunlight each day.
Avoid placing solar panels beneath trees or in permanent shade.
Position the uplighter so it shines directly on the feature you want to highlight.
Push spike-mounted fixtures firmly into stable soil.
Clean the solar panel regularly to maintain efficient charging.
Although solar uplighters are simple to install, choosing the right location is essential for reliable nighttime performance.
Testing the Lighting Effects
Once all garden lighting uplighters are installed, switch them on after sunset to evaluate the results. Walk around your garden from different viewpoints and check how each feature is illuminated.
If necessary:
Adjust the beam angle.
Move spike-mounted uplighters slightly closer or farther away.
Reduce overlapping light between fixtures.
Ensure important features are evenly illuminated.
Eliminate glare by directing light away from seating areas and windows.
Taking time to fine-tune your lighting layout will create a more natural and professional appearance.
Safety Tips
Safety should always be a priority when installing garden lighting uplighters.
Use outdoor-rated fixtures with an appropriate IP waterproof rating.
Keep these tips in mind:
Turn off the power before working on wired lighting systems.
Protect underground cables from damage by routing them carefully.
Avoid overloading transformers with too many fixtures.
Check all electrical connections before switching the system on.
Keep fixtures away from areas where lawn equipment could cause damage.
Inspect lights regularly for loose fittings, damaged cables, or water ingress.
If you are installing mains-powered garden lighting uplighters, it is recommended to have the electrical work completed by a qualified electrician to ensure a safe and compliant installation.
Common Mistakes to Avoid When Installing Garden Lighting Uplighters
Installing garden lighting uplighters can completely transform your outdoor space, but a few common mistakes can reduce their effectiveness or create unnecessary maintenance issues. Avoid the following problems to achieve a professional-looking lighting design.
Using Lights That Are Too Bright
One of the biggest mistakes is choosing uplighters with excessive brightness. Extremely bright lights can create glare, wash out your landscaping, and make your garden uncomfortable to enjoy at night.
Instead, choose lights with a suitable lumen output based on what you’re highlighting:
Small plants: 100–200 lumens
Shrubs: 200–400 lumens
Trees or architectural features: 300–600 lumens
The goal is to create a soft, inviting atmosphere rather than flood the area with light.
Incorrect Beam Angle
The beam angle determines how wide or narrow the light spreads. Choosing the wrong beam angle can leave important features poorly illuminated.
General guidelines include:
15°–25°: Narrow beam for statues, tree trunks, or columns.
30°–45°: Medium beam for shrubs and small trees.
60° or wider: Broad coverage for walls, hedges, or large planting beds.
Selecting the correct beam angle helps your garden lighting uplighters create clean, focused effects.
Image suggestion: Diagram showing narrow, medium, and wide beam angles lighting different garden features.
Poor Placement
Even high-quality lights won’t perform well if they’re installed in the wrong position.
Common placement mistakes include:
Installing lights too close to the object.
Positioning fixtures where plants block the beam.
Aiming lights directly toward seating areas or windows.
Creating uneven spacing between fixtures.
Before making installations permanent, test each light after dark and adjust its position until you achieve the desired effect.
Ignoring Waterproof Ratings
Outdoor lighting is constantly exposed to rain, moisture, dust, and changing weather conditions. Using fixtures without the proper waterproof rating can lead to premature failure.
For reliable outdoor performance:
Choose at least IP65 for most garden installations.
Use IP67 or higher where lights may experience heavy water exposure or temporary flooding.
Ensure cable connectors and transformers are also rated for outdoor use.
Investing in weather-resistant garden lighting uplighters reduces maintenance and extends their lifespan.
Installing Too Many Uplighters
Adding more lights doesn’t always improve the appearance of your garden. Too many uplighters can make the space look cluttered and eliminate the dramatic shadows that create visual interest.
Instead:
Highlight only key landscape features.
Leave some areas darker for contrast.
Mix uplighting with other lighting techniques if needed.
A balanced lighting design usually looks more elegant than one with excessive fixtures.
Poor Cable Management
Messy wiring not only looks unattractive but can also create safety hazards and make future maintenance more difficult.
For a cleaner installation:
Bury low-voltage cables where appropriate.
Secure cables away from walkways.
Use waterproof connectors.
Keep wiring organized and clearly routed.
Proper cable management helps your garden lighting uplighters remain safe, reliable, and visually appealing.
Not Planning Maintenance Access
Many homeowners install uplighters in locations that become difficult to access after plants grow or landscaping is completed.
When planning your lighting layout:
Leave enough space to adjust fixtures.
Ensure bulbs or LED modules can be serviced easily.
Keep transformers accessible.
Avoid burying fixtures under mulch or dense plants.
Planning for future maintenance saves time and prevents unnecessary disruption to your landscape.
By avoiding these common mistakes, your garden lighting uplighters will provide better illumination, last longer, and create a more attractive outdoor environment. Careful planning, proper fixture selection, and thoughtful placement are the keys to achieving professional-quality landscape lighting.
Maintenance Tips for Garden Lighting Uplighters
Regular maintenance keeps your garden lighting uplighters working efficiently and looking their best throughout the year. A few simple checks can extend the life of your lighting system, improve performance, and help you avoid costly repairs.
Cleaning Fixtures
Over time, dirt, dust, leaves, and insect debris can build up on your uplighters, reducing the amount of light they produce.
To keep fixtures clean:
Wipe lenses with a soft cloth and mild soapy water.
Remove mud, grass, and leaves from around the light.
Avoid abrasive cleaners that could scratch the lens.
Clean fixtures every few months or more often in dusty areas.
Clean fixtures provide brighter, clearer illumination and help your garden lighting uplighters perform at their best.
Checking Cables
Outdoor cables can become damaged by gardening tools, weather, animals, or normal wear over time.
During routine inspections:
Look for cracked or exposed wires.
Check that cable connections remain secure.
Ensure cables haven’t shifted above ground.
Replace damaged connectors immediately.
For low-voltage systems, always switch off the power before inspecting or repairing wiring.
Replacing Damaged Fittings
If a fixture is cracked, loose, or no longer waterproof, replace it as soon as possible. Damaged fittings allow moisture inside, which can cause electrical problems and reduce the lifespan of the lighting system.
Signs a fitting should be replaced include:
Cracked housing
Broken lens
Water inside the fixture
Loose mounting bracket
Flickering or unreliable operation
Replacing worn parts early helps keep your garden lighting uplighters safe and reliable.
Cleaning Solar Panels
If you use solar-powered garden lighting uplighters, keeping the solar panels clean is essential for efficient charging.
For the best performance:
Remove dust, pollen, and bird droppings.
Wipe panels with a damp microfiber cloth.
Trim nearby plants that cast shade.
Check that panels receive several hours of direct sunlight each day.
Even a thin layer of dirt can reduce charging efficiency and shorten nighttime operating hours.
Preventing Corrosion
Outdoor lighting is constantly exposed to moisture, making corrosion a common issue, especially in coastal or humid areas.
You can reduce corrosion by:
Choosing stainless steel or powder-coated fixtures.
Tightening loose fittings.
Removing rust as soon as it appears.
Applying a suitable protective coating when recommended by the manufacturer.
Replacing badly corroded hardware.
Proper corrosion prevention helps your garden lighting uplighters remain attractive and functional for many years.
Performing Seasonal Inspections
Inspect your lighting system at least twice a year, ideally in spring and autumn. Seasonal maintenance helps identify small problems before they become expensive repairs.
Your inspection checklist should include:
Testing every light.
Cleaning fixtures and lenses.
Checking transformer operation.
Inspecting cables and connectors.
Adjusting fixture angles if plants have grown.
Trimming vegetation blocking the light.
Confirming waterproof seals remain intact.
After severe storms or freezing weather, inspect the system again for any signs of damage.
Regular care ensures your garden lighting uplighters continue to provide reliable, attractive illumination year after year. By cleaning fixtures, checking cables, replacing damaged components, maintaining solar panels, preventing corrosion, and carrying out seasonal inspections, you can maximize the lifespan and performance of your outdoor lighting system while keeping your garden looking its best.
Are Garden Lighting Uplighters Worth It?
For most homeowners, garden lighting uplighters are a worthwhile investment. They do much more than brighten your outdoor space—they improve the appearance of your garden, increase safety, and provide long-lasting value. Whether you want to highlight beautiful landscaping or create a welcoming atmosphere for outdoor gatherings, uplighters offer several benefits that make them a smart addition to your home.
Enhance the Appearance of Your Garden
One of the biggest advantages of garden lighting uplighters is their ability to transform the look of your garden after dark. By directing light upward, they emphasize trees, shrubs, flower beds, walls, and architectural features that might otherwise disappear at night.
Well-placed uplighters can:
Create depth and dimension.
Highlight focal points in the landscape.
Add warmth and ambience.
Make outdoor spaces more inviting for entertaining or relaxing.
A thoughtfully designed lighting layout can make even a small garden appear more elegant and visually interesting.
Increase Property Value
While outdoor lighting may not dramatically increase a home’s market value on its own, it can significantly improve curb appeal. A well-lit exterior creates a positive first impression for visitors and potential buyers.
Quality garden lighting uplighters can:
Showcase landscaping investments.
Enhance the home’s architectural features.
Improve the overall appearance of the property.
Help your home stand out in the neighborhood.
Homes with attractive outdoor lighting often appear better maintained and more appealing.
Improve Security
Outdoor lighting plays an important role in home security. Dark areas around your property can provide hiding places for intruders, while properly positioned uplighters help improve visibility.
Garden lighting uplighters can:
Illuminate pathways and entrances.
Reduce dark corners around the property.
Make it easier to navigate outdoor areas at night.
Complement motion-sensor security lights for added protection.
Although uplighters are mainly decorative, they can contribute to a safer outdoor environment when used as part of a complete lighting plan.
Save Energy
Modern garden lighting uplighters are far more energy-efficient than older outdoor lighting systems. Most use LED technology, which consumes very little electricity while providing excellent brightness.
Additional energy-saving benefits include:
Lower electricity bills.
Long-lasting LED bulbs that require fewer replacements.
Solar-powered options that operate without using household electricity.
Compatibility with timers and smart lighting controls.
Choosing LED or solar uplighters allows you to enjoy beautiful outdoor lighting with minimal running costs.
Offer Long-Term Durability
High-quality outdoor lighting is built to withstand changing weather conditions. Many garden lighting uplighters are made from durable materials such as stainless steel, aluminum, or powder-coated metal and are designed with waterproof ratings like IP65 or higher.
With proper maintenance, quality uplighters can:
Resist rain and moisture.
Handle temperature changes.
Maintain reliable performance for many years.
Require only occasional cleaning and inspections.
Investing in durable fixtures reduces maintenance costs and extends the life of your lighting system.
Provide Excellent Value for Money
When considering appearance, safety, energy efficiency, and durability together, garden lighting uplighters offer excellent overall value.
They provide long-term benefits by:
Enhancing your outdoor living space.
Improving your home’s visual appeal.
Reducing energy consumption with LED or solar options.
Lasting for years with proper care.
Requiring relatively little maintenance.
While the initial installation cost varies depending on the size of your garden and the number of fixtures, the long lifespan and low operating costs make uplighters a cost-effective investment for most homeowners.
For homeowners who want a more attractive, functional, and enjoyable outdoor space, garden lighting uplighters are well worth the investment. They improve the appearance of your landscape, contribute to home security, use very little energy, and provide years of reliable performance. With the right design and quality fixtures, they deliver excellent value for money while making your garden a beautiful place to enjoy after sunset.
What are garden lighting uplighters?
Garden lighting uplighters are outdoor light fixtures designed to shine light upward onto trees, shrubs, walls, sculptures, and other landscape features. They are commonly used to add depth, highlight focal points, and create an attractive atmosphere in gardens after dark. Most modern uplighters use energy-efficient LED technology or solar power.
Where should garden lighting uplighters be installed?
The best location depends on the feature you want to highlight. Common installation spots include:
At the base of trees
Around shrubs and flower beds
Along garden walls
Near statues and water features
Beside architectural elements such as columns or stonework
Before permanently installing the fixtures, test their position at night to achieve the best lighting effect while avoiding glare.
Are LED garden lighting uplighters better than solar?
Both options have advantages.
LED garden lighting uplighters are ideal if you want consistent brightness, longer operating hours, and reliable performance throughout the year. They require a wired low-voltage or mains-powered system.
Solar uplighters are easier to install because they don’t require wiring. They work best in locations that receive plenty of direct sunlight but may provide reduced brightness or shorter run times during cloudy weather or winter months.
The best choice depends on your budget, installation preferences, and lighting needs
How many lumens do I need for garden uplighters?
The ideal brightness depends on what you’re lighting.
A general guide is:
100–200 lumens: Small plants and flower beds
200–400 lumens: Shrubs and small trees
300–600 lumens: Large trees and architectural features
600+ lumens: Large focal points or areas requiring stronger illumination
Using the appropriate brightness helps create balanced and attractive garden lighting uplighters without making the garden appear overly bright.
Are garden lighting uplighters waterproof?
Yes. Most outdoor garden lighting uplighters are designed to withstand rain and moisture, but it’s important to check the IP (Ingress Protection) rating.
For most gardens:
IP65 is suitable for general outdoor use.
IP67 offers additional protection where fixtures may experience heavy water exposure.
Always choose fixtures specifically designed for outdoor installation.
Can I install garden lighting uplighters myself?
Many homeowners can install solar or low-voltage garden lighting uplighters themselves by following the manufacturer’s instructions.
However, if your project involves mains-powered electrical wiring, it is generally safer and often legally required to have the installation completed by a qualified electrician. This helps ensure the system meets local electrical regulations and operates safely.
Conclusion
Garden lighting uplighters are one of the most effective ways to enhance the beauty, functionality, and safety of your outdoor space. Whether you want to highlight mature trees, showcase garden features, illuminate pathways, or create a warm evening atmosphere, the right uplighters can completely transform your landscape after sunset.
By choosing the appropriate type of uplighter, selecting the correct beam angle and brightness, planning the layout carefully, and carrying out regular maintenance, you can enjoy reliable and energy-efficient lighting for many years. LED and solar options also make it easier than ever to achieve impressive results while keeping running costs low.
Before starting your project, take time to assess your garden, identify the features you want to highlight, and avoid common installation mistakes. A well-designed lighting plan not only improves your outdoor living experience but can also boost your home’s curb appeal and overall value.
With the tips and advice in this guide, you’re ready to choose and install the best garden lighting uplighters for your garden and create an outdoor space that looks just as stunning at night as it does during the day.